Mississinewa 2000

Mississinewa 2000
We need it tomorrow!

Wednesday, July 17, 2013

Buttons!

I have had several requests for info on how to sew on a sturdy button.  I have searched you tube and found the following:

Here is a Brit lady showing the proper way to sew on a flat button.  If your thread gets kinky, use beeswax on the thread.  The little shank that is created by wrapping the thread around gives space for buttoning thick fabrics, and just makes buttoning a flat button easier. Using a toothpick  works great.

http://www.youtube.com/watch?v=7-1JuHfuK9Q

Another version of sewing on a flat button. Very well done.

http://www.youtube.com/watch?v=UPCY1DxUuQ4

Here is a way to sew on shank buttons - like our uniform buttons

http://www.youtube.com/watch?v=UPCY1DxUuQ4


One of my tricks is to use a drop of Fray Check on the threads.  This product is available at all sewing stores. It is a bit stinky until it dries.

Monday, April 15, 2013

Historical Knitting workshop


Recently our 7 Years War (French & Indian War) reenactment group had it's annual meeting. A few of us had planned the afternoon workshop on the history of knitting and how to knit. My ulterior motive was to get everyone knitting, even the guys and the kids. Much later, glancing around, we realized how nice and calm the room was and almost everyone was knitting, including the two girls and one of the guys. Mission accomplished!

Our project was to be simple slippers to wear inside our sabots or to wear to bed. We have been plenty of cold places camping and warm feet are so nice - I don't sleep well if my feet are cold. One of the ladies had prepared knitting needles from dowels and supplied wool yarn from Knit Picks. Another lady and myself had knitted sample booties. I had plenty of helpers to help get everyone started.

These are Mike's, made by Marianne of 2 strands of sport weight


These are mine, made from 2 strands of homespun

Mike's, to wear inside his heavy modern snow boots


Kids size, handspun

                                                                          My main source for the history of knitting was Mary Thomas' first book, and I mentioned the second one.  Here are links to Amazon for these books.


http://tinyurl.com/d3q62mf

http://tinyurl.com/ceovy4y

I had hope to find Knitting in the Old Way, but was not able to. I hoped it would have helped.


http://tinyurl.com/chrvfc5

Anyway, I explained that knitting is an ancient craft, from before Jesus' time.  I started in Assyria, spread to Egypt and then to ancient Europe. Many things were made, not just socks and hats and sweaters. The first Thomas book has wonderful photos of a knights surtout, purses and more. I especially wanted the guys to know that everyone knitted - we all needed garments! there is a great illustration in the Thomas book of a man and a woman knitting. One of my favorite paintings - I hope to get it someday - is "Dreaming on the Windowsill" by August Fredrich Siegert. It has both of my favorite fiber crafts - spinning and weaving - in a historical setting. Perfect!


Knitting was such a skill that it became a guild.  People specialized in certain items until certain towns or regions became known as "the" place to get stockings, etc. Some inventions were created, like the knitting looms in rectangular and round shapes. These exist today and are often used to make hats or socks, blankets or shawls. Many stores carry the knitting looms in plastic. One of my uncles has turned out thousands of hats for children's charities using the knitting loom in the round shape. I just purchased a new version of the rectangular version which is adjustable for knitting different sizes of socks.  As soon as I finish the knee socks I am working on, I will try it. A historical term for the rectangular looms is "rake". One photo here shows the knitting in progress.


sets from Joann Fabrics


I also showed the knitting spool - a good craft for kids, but I have used mine instead of making i-cord on knitting needles. I plan to take these along on our history camping trips to let the little kids use.

Thursday, March 21, 2013

Finishing the pokalem

Greetings! Let's finish that pokalem!


Sew red trim to the upper edge of outer band section.  (This can be done on machine using ¼ inch seam).  Sew outer section of the band into a cylinder. Sew the other section of the band into a cylinder.  Second cylinder does not have trim.


Edge stitch the long side of both drawstring liner pieces.  Sew into a cylinder, turn under 5/8 inch on one side of the drawstring liner piece.  Stitch 1/2 inch away from the edge forming a hem.  Leave a one inch for an opening for the cord to go through


Take the band cylinder (the one without the trim) and attach the drawstring liner at the dotted line.  You are applying the right side of the drawstringliner to the right side of the cylinder.  The top of
the liner will face down and to topside of cylinder will be up.  Stitch ¼  inch seam as shown on pattern
piece for drawstring liner.  Flip liner over to cover seam and press.
 
 
Sew the bands, the escutcheon, and earflaps together as follows.  Make sure that the buttonhole
for the chinstrap is on the left side when the item is finished. 


Take cylinder with the red trim (trim is at the top).   Pin the bottom center front of cylinder with escutcheon
center front.  Pin center back of the earflap piece to the center back of the cylinder (the seam is the center back).  Pin all the way around, earflap front edge will go over the escutcheon edge on both sides.
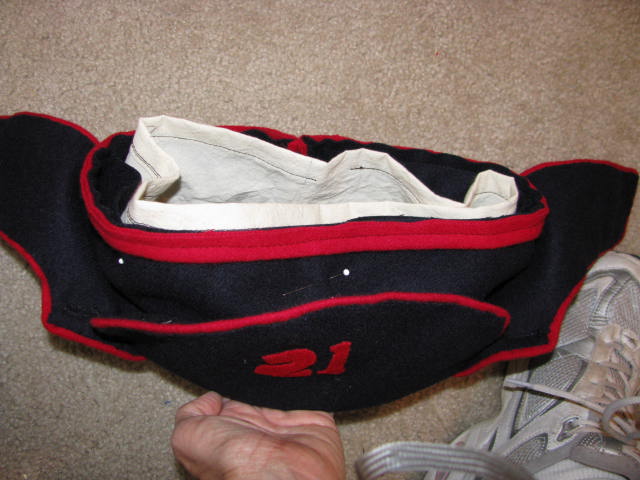
Here is the drawing and a photo.  Pay attention to the dotted lines, that the eschtcheon is under the earflaps.
 
 
Now it is really starting to look like something!


Take the cylinder with the liner attached, turn it wrong side out, fit it over the pieces just pinned.   Be sure that liner is not going to be caught in bottom seam, and that the top of the cylinder with the liner is at the top.  Match center back seams, pin.   Sew a ¼ inch seam at the bottom. 


 Press open the seam, turn band with liner so that it is inside the hat, press.  Run drawstring through hem of liner.  Pin the top edge of the band pieces together.  Leave pokalem inside out.  Place a pin at center back and center front.


Hand gather the top.  (I do it in 2 sections because it is easier to control).  


 Place a pin at center front and center back of top circle piece. Do you see the green pin heads?
 
 
 Pin top to band at center front and center back.  Gather top to fit the band and pin all the way around.  Leave an opening on each side for the earflap to tuck inside the hat. 


Sew the top and band together by hand with a ¼ inch seam. 


 Turn right side out. 


Tuck earflaps through openings so you can mark where your buttons need to be on the escutcheon.
 
Sew on buttons to escutcheon only; do not sew through into the band.  Tie drawstring and try on hat for fit, adjust drawstring if necessary.  Un-tuck earflaps to mark for button on chin strap.  Sew on chin button.
 
You are done! Here is the completed pokalem!


Thanks for modeling Jason!